webpack5를 이용하여 react v18 + typescript 프로젝트 셋팅하는 방법 정리 기본적인 셋팅 과정을 간략하게 정리한 글이므로 구체적인 설명은 생략
패키지 매니저: yarn(classic) why? - npm과 더불어 가장 클래식한 패키지 매니저라고 생각하여 yarn classic으로 과정 정리
만약 이 글을 참고하신다면, 진행 중인 프로젝트의 성격에 맞게 Eslint, Prettier, typescript, babel 등 설정을 자유롭게 변경해주세요.
과정
- React 프로젝트에 필요한 패키지 설치
yarn add react react-dom - webpack 관련 패키지 설치
yarn add -D webpack webpack-cli webpack-dev-server - babel-loader, css-loader, style-loader 설치
yarn add -D babel-loader css-loader style-loader - babel/core, bable/preset, babel module resolver 패키지 설치
yarn add -D babel-loader @babel/core @babel/preset-env @babel/preset-react babel-plugin-module-resolver - webpack 설정에 유용한 플러그인 설치
yarn add -D html-webpack-plugin clean-webpack-plugin speed-measure-webpack-plugin - 타입스크립트 적용을 위한 패키지 설치
yarn add --dev typescript ts-loader @types/react @types/react-dom @babel/preset-typescript - 프로젝트 루트에
tsconfig.json생성 후 설정{ "compilerOptions": { "target": "ESNext", "jsx": "react-jsx", "module": "ESNext", "esModuleInterop": true, "forceConsistentCasingInFileNames": true, "strict": true, "skipLibCheck": true, "baseUrl": "src", "moduleResolution": "node", "typeRoots": ["node_modules/@types", "src/types"], "sourceMap": true, "resolveJsonModule": true, "types": ["node"], }, "include": ["src/**/*"], "exclude": ["node_modules"] } babel.config.js설정module.exports = { presets: [ ['@babel/preset-react', { runtime: 'automatic' }], '@babel/preset-env', '@babel/preset-typescript', ], plugins: [ [ 'module-resolver', { root: ['./src'], extensions: ['.ts', '.tsx', ',json'], }, ], ], };- 프로젝트 루트
/src폴더 생성 후,App.tsx와index.tsx생성// App.tsx import React from 'react'; const App: React.FC = () = { return h1 Hello world! /h1 } export default App;// index.tsx import ReactDOM from 'react-dom/client'; import App from './App'; const root = ReactDOM.createRoot( document.getElementById('root') as HTMLElement ); root.render(App /); /public폴더에index.html생성webpack.config.js파일 생성 후 설정 - 개발 모드에 따라 dev, prod 나눠서 webpack 파일을 생성(webpack.dev.js,webpack.prod.js)예를 들어, dev server 옵션 설정은 개발 모드일 때 설정해주면 된다.
const path = require('path'); const HtmlWebpackPlugin = require('html-webpack-plugin'); module.exports = { mode: 'development', // or 'production' entry: './src/index.tsx', output: { path: path.resolve(__dirname, 'dist'), filename: 'bundle.js', }, module: { rules: [ { test: /\.(tsx|ts|jsx|js)?$/, exclude: /node_modules/, use: [ 'babel-loader', { loader: 'ts-loader', options: { transpileOnly: true, }, }, ], }, { test: /\.css$/, // CSS 파일에 대해 로더 사용 use: ['style-loader', 'css-loader'], }, ], }, resolve: { extensions: ['.ts', '.tsx', '.js', '.jsx'], }, plugins: [ new HtmlWebpackPlugin({ template: './public/index.html', // HTML 템플릿 설정 }), ], devServer: { static: path.join(__dirname, 'dist'), compress: true, port: 3000, }, };package.json에 실행 스크립트 추가"scripts":{ "dev":"webpack-dev-server --mode=development --config webpack.config.js --hot --progress", "start": "webpack --mode=development --config webpack.config.js --progress" }- 개발 서버 실행
yarn dev
번외 1) eslint 설정
eslint와 필요한 플러그인 설치
yarn add -D eslint eslint-config-airbnb eslint-config-airbnb-typescript eslint-config-prettier
yarn add -D eslint-plugin-import eslint-plugin-jsx-a11y eslint-plugin-prettier eslint-plugin-react eslint-plugin-react-hooks
yarn add -D @types/eslint @typescript-eslint/eslint-plugin @typescript-eslint/parser
- package.json에 eslintConfig 설정 추가
{
  "eslintConfig": {
    "extends": [
      "react-app",
      "react-app/jest"
    ]
  },
}
→
react-app이 제공하는 기본 ESLint 규칙과 Jest 테스트를 위한 추가 규칙을 포함(extends) 하는 설정 - 프로젝트 루트 파일에
.eslintrc.json파일 생성(typescript 적용을 위해 **tsconfig.json*을 생성했다고 가정){ "root": true, "extends": ["airbnb-typescript"], "plugins": ["@typescript-eslint", "prettier", "import"], "parser": "@typescript-eslint/parser", "parserOptions": { "project": "./tsconfig.json", "ecmaVersion": 12, "ecmaFeatures": { "jsx": true }, "sourceType": "module" }, "rules": { "no-useless-constructor": "off", "import/no-extraneous-dependencies": 0, "import/extensions": ["off"], "import/order": [ "error", { "groups": ["builtin", "external", "internal"], "pathGroups": [ { "pattern": "react", "group": "builtin", "position": "after" }, { "pattern": "react-dom", "group": "builtin", "position": "after" } ], "pathGroupsExcludedImportTypes": ["react", "react-dom"], "alphabetize": { "order": "asc", "caseInsensitive": true } } ], "@typescript-eslint/indent": "off", "@typescript-eslint/comma-dangle": "off", "react/jsx-filename-extension": "off", "@typescript-eslint/no-useless-constructor": "off", "@typescript-eslint/consistent-type-imports": "error" }, "env": { "jest": true } }
번외 2) chunk hash 적용
- output 파일에 대한 캐싱 처리를 위해 filename과 chunkFilename에 hash를 설정할 수 있음
- 파일에 변경사항이 발생하면 번들링할 때 output의 filename hash를 다르게 적용 → 브라우저가 변경된 파일에 대해서만 새로 다운로드하도록 성능을 개선할 수 있음(같은 file 명에 대해서는 브라우저가 캐싱)
const path = require('path');

module.exports = {
  entry: './src/index.tsx',
  output: {
    path: path.resolve(__dirname, 'dist'),
    filename: '[name].[contenthash].js', // 해시 포함
    chunkFilename: '[name].[contenthash].js', // 청크 파일에도 해시 적용
  },
  // ...기타 설정
};
번외 3) optimization - code spliting 적용
- 여러 파일에서 자주 사용되는 패키지의 경우에는 별도 chunk로 분리
- 초기 로딩 시 불필요한 코드 양을 줄이고 브라우저가 더 빠르게 어플리케이션을 로드 가능
- 잘 변경되지 않는 패키지에 대해 브라우저 캐싱을 하여 라이브러리를 업데이트하지 않는 한 해당 청크에 대해서 캐싱된 버전을 사용 → 다운로드 요청 수 최적화, 로딩 속도 개선
- 패키지의 버전이 변경되더라도 애플리케이션 코드와 분리되어 있기 때문에 패키지 관련 코드가 중복되지 않고 어플리케이션에 영향을 최소화할 수 있음
    optimization: {
      splitChunks: {
        cacheGroups: {
          reactVendor: {
            test: /[\\\\/]node_modules[\\\\/](react|react-dom|react-router-dom)[\\\\/]/,
            name: 'vendor-react',
            chunks: 'all',
          },
        },
      },
    },
react,react-dom,react-router-dom패키지는 react 앱 프로젝트에서 필수로 사용되는 패키지- 따라서 위와 같이 별도 청크로 분리해주면, 해당 청크가 필요한 시점에 로드되어 사용 → 번들링된 모듈에서 내에서 불필요한 중복 코드를 방지
번외 4) esbuild-loader 와 webpack5 함께 쓰기
https://www.npmjs.com/package/esbuild-loader
https://fe-developers.kakaoent.com/2022/220707-webpack-esbuild-loader/
https://velog.io/@votogether2023/ts-loader를-esbuild-loader로-마이그레이션해보자
esbuild-loader설치
yarn add -D esbuild-loader
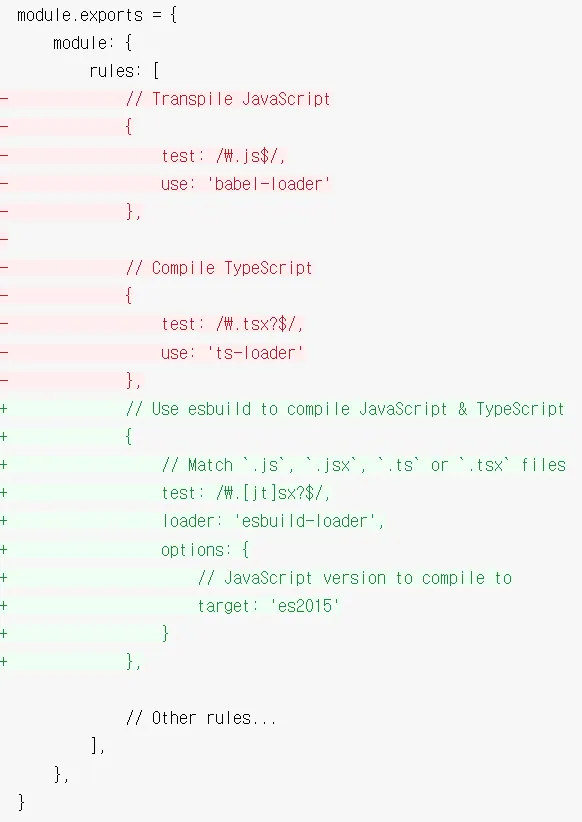
esbuild-loader는babel-loader와ts-loader를 대체함
  module.exports = {
      module: {
          rules: [
-             // Transpile JavaScript
-             {
-                 test: /\\.js$/,
-                 use: 'babel-loader'
-             },
-
-             // Compile TypeScript
-             {
-                 test: /\\.tsx?$/,
-                 use: 'ts-loader'
-             },
+             // Use esbuild to compile JavaScript & TypeScript
+             {
+                 // Match `.js`, `.jsx`, `.ts` or `.tsx` files
+                 test: /\\.[jt]sx?$/,
+                 loader: 'esbuild-loader',
+                 options: {
+                     // JavaScript version to compile to
+                     target: 'es2015'
+                 }
+             },

              // Other rules...
          ],
      },
  }
- 다만
esbuild-loader는 트랜스파일을 할 뿐, 타입 체킹을 하지 않기 때문에 별도의 플로그인으로 타입 체킹을 수행해야 함
yarn add -D fork-ts-checker-webpack-plugin
const ForkTsCheckerWebpackPlugin = require('fork-ts-checker-webpack-plugin');
 // ...

module.exports = {
 // ... 생략 ...
 plugins: [
      new ForkTsCheckerWebpackPlugin({
        typescript: {
          configFile: './tsconfig.json',
        },
      }),
      // ...
  ]
}
- 만약 production 모드 파일 압축을 webpack Terser 대신 Esbuild를 사용하고 싶다면,
EsbuildPlugin을 minimizer로 설정해야 함
+ const { EsbuildPlugin } = require('esbuild-loader')

  module.exports = {

+     optimization: {
+         minimizer: [
+             new EsbuildPlugin({
+                 target: 'es2015'  // Syntax to transpile to (see options below for possible values)
+				          css: true,
+             })
+         ]
+     },
  }